When you create an Azure App Service, it’s open to the public internet by default. This openness, while convenient, leaves your service vulnerable to various attacks such as Distributed Denial of Service (DDoS), Cross-Site Scripting (XSS), and SQL Injection. To secure your app, you need a Web Application Firewall (WAF) in front of it.
Secure Your App Service with Azure Front Door
One way to add a WAF is by using Azure Front Door, a global service offering features such as WAF, caching, and routing. Azure Front Door has a standard SKU priced at US$35 per month. However, the standard SKU lacks fully managed WAF rules, which means you must manually configure rules to protect against:
- Zero-day vulnerabilities
- Top-10 attack techniques
- Use of stolen/exposed credentials
For enhanced security, Azure Front Door Premium at US$330 per month offers managed firewall rules, providing a higher level of protection with less manual intervention.
Refer to the Azure Front Door pricing model comparison page for more information.
Secure Your App Service with Cloudflare
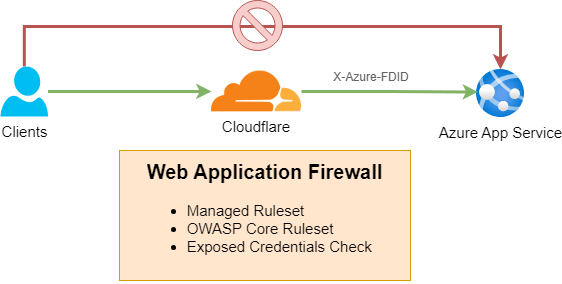
An alternative is to use Cloudflare, a service that offers extensive features including unmetered DDoS protection, DNS hosting, SSL certificate management, multi-level caching at the edge, image optimization, analytics, and more. Cloudflare’s free plan provides WAF protection with a free managed ruleset. However, upgrading to the Pro plan for US$20 per month gives you access to advanced WAF protection, including:
Preventing users from bypassing the WAF
To ensure that all traffic to your Azure App Service passes through the WAF, follow these steps:
Step 1: Configure Cloudflare
- Login to Cloudflare and navigate to the “Rules” menu.
- Click on “Header Modification” > “Modify Request Header” > “Create rule”.
-
Create a rule with the following settings:
- Rule Name: App Service Key
- Condition: All incoming requests
- Action: Set Static Header
- Header Name: X-Azure-FDID
- Value: <Your-Secret-ID>
- Deploy the rule.

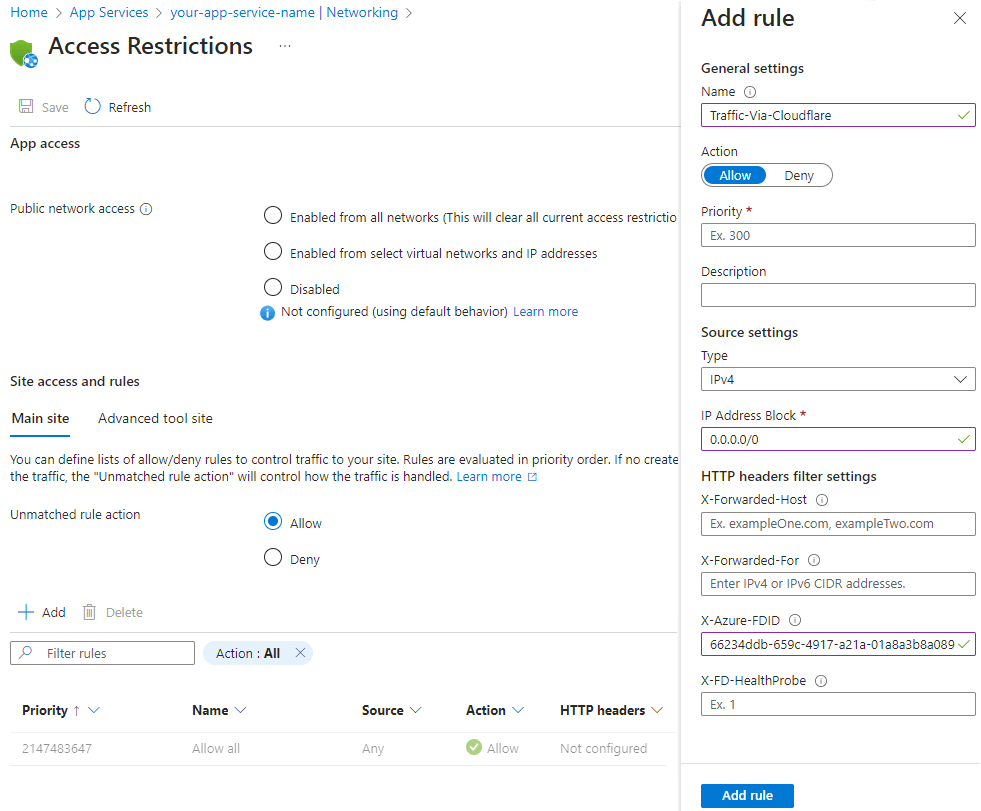
Step 2: Configure Azure App Service
- In the Azure Portal, go to your App Service.
- Navigate to the “Networking” section.
- Under “Public network access”, select “Enabled with no access restrictions”.
-
Under “Site access and rules”, add a new rule:
- Name: Cloudflare-Traffic
- Priority: 100
- Type: IPv4
- IP Address Block: 0.0.0.0/0 (or Cloudflare’s outbound IP ranges)
- X-Azure-FDID: <Your-Secret-ID>
This setup ensures that all traffic to your app service must have the X-Azure-FDID header with the secret value set in Cloudflare. Any traffic without this header is blocked, effectively preventing users from bypassing the WAF.
Conclusion
Securing your Azure App Service is critical to protect it from various attacks. By using a WAF like Azure Front Door Premium or Cloudflare’s Pro plan, and configuring request headers to ensure all traffic passes through the WAF, you can significantly enhance the security of your app service. Choose the solution that best fits your needs and budget to keep your applications safe and secure.